- Afrikaans
- Albanian
- Amharic
- Arabic
- Armenian
- Azerbaijani
- Basque
- Belarusian
- Bengali
- Bosnian
- Bulgarian
- Catalan
- Cebuano
- Corsican
- Croatian
- Czech
- Danish
- Dutch
- English
- Esperanto
- Estonian
- Finnish
- French
- Frisian
- Galician
- Georgian
- German
- Greek
- Gujarati
- Haitian Creole
- hausa
- hawaiian
- Hebrew
- Hindi
- Miao
- Hungarian
- Icelandic
- igbo
- Indonesian
- irish
- Italian
- Japanese
- Javanese
- Kannada
- kazakh
- Khmer
- Rwandese
- Korean
- Kurdish
- Kyrgyz
- Lao
- Latin
- Latvian
- Lithuanian
- Luxembourgish
- Macedonian
- Malgashi
- Malay
- Malayalam
- Maltese
- Maori
- Marathi
- Mongolian
- Myanmar
- Nepali
- Norwegian
- Norwegian
- Occitan
- Pashto
- Persian
- Polish
- Portuguese
- Punjabi
- Romanian
- Russian
- Samoan
- Scottish Gaelic
- Serbian
- Sesotho
- Shona
- Sindhi
- Sinhala
- Slovak
- Slovenian
- Somali
- Spanish
- Sundanese
- Swahili
- Swedish
- Tagalog
- Tajik
- Tamil
- Tatar
- Telugu
- Thai
- Turkish
- Turkmen
- Ukrainian
- Urdu
- Uighur
- Uzbek
- Vietnamese
- Welsh
- Bantu
- Yiddish
- Yoruba
- Zulu
Nov . 05, 2024 23:35 Back to list
How to Repair Your Mountain Bike Derailleur for Smooth Shifting
How to Fix a Derailleur on a Mountain Bike
Mountain biking can offer some of the most thrilling experiences for cycling enthusiasts, but it can also lead to mechanical issues, especially with components like the derailleur. The derailleur is a crucial part of your bike's gear system, enabling smooth shifts and effective power transfer. If you're facing issues with your derailleur, don't worry. Here's a step-by-step guide on how to fix it and ensure you’re back on the trails in no time.
Understanding the Derailleur
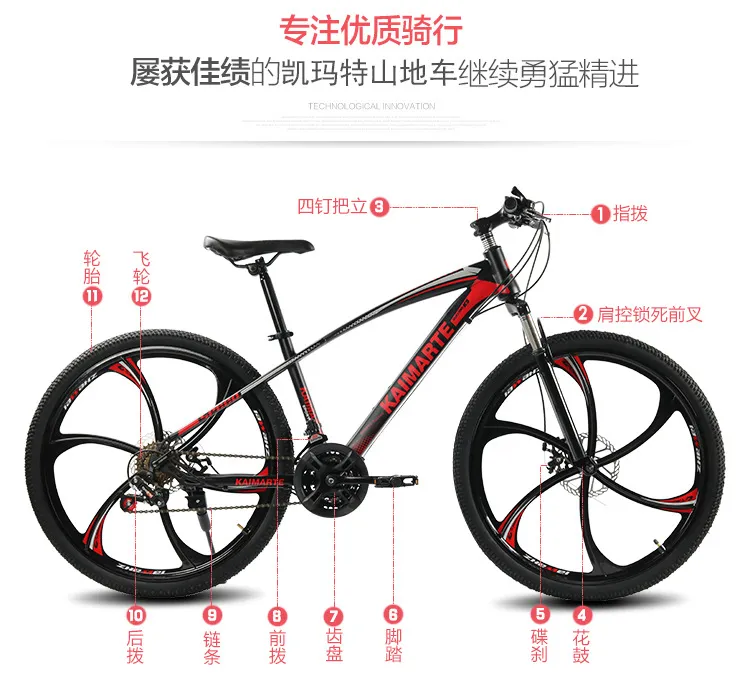
The derailleur is a mechanism that moves the chain between different gears. Typically located at the rear of the bike, it consists of a pulley system that can either raise or lower the chain to access various gears, controlled by shifters on the handlebars. Common derailleur problems include misalignment, cable issues, and wear and tear.
Tools You’ll Need
Before starting your repair, gather the necessary tools - Phillips screwdriver - Allen wrenches (usually 4mm or 5mm) - Chain tool (optional, for chain issues) - Bike lubricant - Cleaning rag
Step 1 Inspect the Derailleur
Begin by visually inspecting the derailleur. Look for - Alignment The derailleur should be parallel to the cassette and the chain. If it’s bent or twisted, it may need to be realigned or replaced. - Cable Condition Check the derailleur cable for fraying or corrosion. If it looks worn out, replacing the cable is essential. - Pulleys Examine the jockey wheels (pulleys) for dirt or damage. They should spin freely without obstruction.
Step 2 Adjusting the Derailleur
If your derailleur seems misaligned, adjustments can often resolve shifting issues.
how to fix derailleur on mountain bike

1. Limit Screws Find the limit screws labeled H (high) and L (low) on the derailleur. These control how far the derailleur moves. Adjust these screws to ensure the chain can’t shift beyond the smallest or largest cog. 2. B-Tension Screw This screw controls the distance between the derailleur and the cassette. Adjust it so there’s enough clearance to prevent the chain from rubbing on the derailleur when in lower gears.
Step 3 Cable Adjustment
1. If the cable is fine but the shifts are still sticky, you’ll need to tension the cable. Shift to a middle gear, loosen the bolt holding the cable, and pull it taut before retightening. This tension helps with smoother shifts. 2. If the cable is damaged, follow these steps to replace it - Detach the old cable from the shifter and the derailleur. - Thread the new cable through the shifter and down to the derailleur, making sure it's securely fastened. - Adjust the tension as described above.
Step 4 Lubricate and Clean
Make sure the derailleur and chain are clean for optimal performance. Use a rag to wipe down any excessive dirt and apply a few drops of bike-specific lubricant to the pulleys and moving parts of the derailleur.
Step 5 Test Ride
After making adjustments, take your bike for a short test ride. Shift through all the gears to ensure smooth transition. If any gears feel sticky or unresponsive, return to make micro-adjustments on the limit screws or cable tension.
Conclusion
Fixing your mountain bike's derailleur may seem intimidating, but with these steps, you can tackle most common issues. Regular maintenance, like keeping the derailleur clean and checking the cable condition, will extend the life of your component. Whether you’re preparing for a ride or repairing after a trail adventure, a well-functioning derailleur will provide the performance you expect and keep your MTB challenges exhilarating yet enjoyable. Happy riding!
-
The Ultimate Kids' Four-Wheeler Experience
NewsJul.09,2025
-
The Ultimate Guide to Mountain Bikes: Gear Up for Your Ride
NewsJul.09,2025
-
The New Age of Cycling: Electric Bikes for Every Rider
NewsJul.09,2025
-
The Best Kids Bicycles: Ride in Style and Safety
NewsJul.09,2025
-
The Best 3-Wheel Scooters for Kids: Fun, Safety, and Adventure
NewsJul.09,2025
-
Revolutionize Your Ride: Affordable Electric Bikes
NewsJul.09,2025
-
Finding the Perfect Mountain Bike for Every Rider
NewsJul.09,2025


